


Need advice on a new HT setup
 08-11-04, 11:19 PM
#1
DVD Talk God
Thread Starter
Need advice on a new HT setup
I'm about to make the leap to an X1 and want to make sure I get most of the room designing right before I go further. This will be an x1 ceiling mount.
Height to ceiling 7'6"
Width of room 14'6"
Length of room 25'
Now for the tricky. Because of weight equipment, the furthest I can have my seating postion is 13' from the viewing wall.
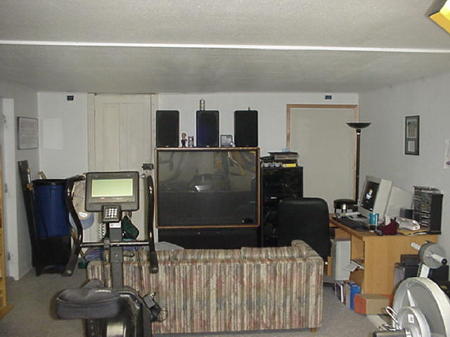
As you can see in the picture, there is a door to either side of my current 61" Hitatchi. The space between the doors is 5'9" and the ceiling is 7'6".
Okay, I can take out either or both doors with little effort, and am willing to do so. I have other access to both, so it would be slightly less convenient, but is certainly worth the sacrifice.
As you can see, I am full of junk right now. My vision is to get rid of the computer to the right completely. My new computer is on the way and will be a Media Center PC with wireless everything. I see myself (when using both PC and TV) having them on a split screen. I will need about 2-3' at the floor for all my components, but otherwise can go all the way up.
So....how big of a screen can I end up with, how far back do I need to mount the X1, and what have I possible not thought of?
Also, where does one get computer cables to hook into the X1 that are approximately 30' long?
Height to ceiling 7'6"
Width of room 14'6"
Length of room 25'
Now for the tricky. Because of weight equipment, the furthest I can have my seating postion is 13' from the viewing wall.
As you can see in the picture, there is a door to either side of my current 61" Hitatchi. The space between the doors is 5'9" and the ceiling is 7'6".
Okay, I can take out either or both doors with little effort, and am willing to do so. I have other access to both, so it would be slightly less convenient, but is certainly worth the sacrifice.
As you can see, I am full of junk right now. My vision is to get rid of the computer to the right completely. My new computer is on the way and will be a Media Center PC with wireless everything. I see myself (when using both PC and TV) having them on a split screen. I will need about 2-3' at the floor for all my components, but otherwise can go all the way up.
So....how big of a screen can I end up with, how far back do I need to mount the X1, and what have I possible not thought of?
Also, where does one get computer cables to hook into the X1 that are approximately 30' long?
 08-12-04, 02:35 PM
#2
DVD Talk Legend
So....how big of a screen can I end up with, how far back do I need to mount the X1, and what have I possible not thought of?
In my room my front row is 11' from a 100" screen and the back row is 13'. My total room dimensions are 19' x 15'.
As far as what you have not thought of?

I would take your time, sketch this out and plan for every possible run of cable, lighting, hvac and display that you think you might need. I planned for 6 months and still did not get 100% of what I had wanted.
08-12-04, 04:39 PM
#5
DVD Talk Hall of Fame
http://www.projectorcentral.com/proj...calculator.cfm
is useful.
There are most certainly other projectors out there that will throw a bigger picture from the same distance as the X1, some of them even reasonably priced. The Samsung PLV-Z1 is a pretty popular example. But if the X1 throws a big enough picture for you (use the calculator above), I'm sure you'll be happy with it.
08-12-04, 05:23 PM
#7
DVD Talk Legend
Originally posted by kvrdave
http://www.infocus.com/products/prod...=1&prod=x1&c=4
I don't see anything about "throw"
http://www.infocus.com/products/prod...=1&prod=x1&c=4
I don't see anything about "throw"
08-12-04, 05:45 PM
#9
DVD Talk Hall of Fame
Originally posted by kvrdave

Thanks. Looks like 15' would get me a nice 100" widescreen image.
Thanks. Looks like 15' would get me a nice 100" widescreen image.
Y'know, there's a Zoom range you can play with, too. 100" is for 15' and 1x. 1.21x would be 124" diagonal.
08-12-04, 05:49 PM
#10
DVD Talk Legend
Originally posted by kvrdave
Thanks. Looks like 15' would get me a nice 100" widescreen image.
Thanks. Looks like 15' would get me a nice 100" widescreen image.
This is why planning is important. You can let the screen size determine where to mount a projector or you may have to mount a projector at a certain distance and have to go with a screen size there plus the zoom.
My advice again, sketch it, plan it, measure it (three times if necessary) to make SURE it is right. How about left right and center speakers around the screen? Where does the sub go? How far below the ceiling is the screen frame going to be? The screen size is not the FRAME size.
08-16-04, 09:04 PM
#11
DVD Talk Hero
A guy posted these detailed instructions over at FatWallet for building a ceiling mount for the X1 (he got it from AVS Forum). Anyway, I literally just built this mount and hung my X1 about 2 hours ago. The mount runs less then $35 and is very, very strong and adjustable. I went in a ceiling joist, so didn't need the drywall hangers. I also added bolts to hold the flange to the plexiglass.
"For those who are considering ceiling mount.
I just made one myself, following an article from avsforum.
Please note, this is not my original idea. I'm just putting down all the details so people who never touched an elec drill like me, will be able to make one themselves.
All parts are from home depot with detail part#.
1/2'' floor flange ($1.99, 636660610039) x2
self drilling drywall toggle bolts (hold 90 pounds,including anchors, $2.76, 092097100060) x2
1/2'' CLS steel pipe nipple ($0.59, 636660104002) x1
1/4'' x 3/4'' flat head slotted screws (5 pieces, $0.78, 030699287512) x1
.236 18x24 AC 21-MC (Dont know material. I call it organic glass. only need 1/3 of it. Smaller size was OOS. $11.33, 769125020316) x1
Hex bolt 4mm 0.7 x 25mm(2 pieces, $0.23, 030699355884) x2
Flat cut washers size #8(30pieces, $0.78, 030699198016) x1
Total cost without organic glass $12.11. If you can get smaller size organic glass, your total cost will be about $17, otherwise like me $23.44
Tools required
Electrical drill, used to drill holes on organic glass and to screw flange on the wall)
Utility Knife(box cutter. If you don't have it, you can get from home depot. $2.94, 076174102994), used to cut organic glass.
Total setup time
1.5 hours
Basic Idea
Fix one floor flange on the ceiling(if you don't know what this is, check out Here )
fix the other flange on the organic glass.
connect two flanges with pipe nipple(metal stick that screws into flange. One flange on each end.)
fix projector onto organic glass.
So it goes from ceiling to flange to pipe nipple to flange to organic glass to projector.
Procedure
1. Mark positions of four bolts for ceiling floor flange. Make sure it's at least 10 inches away from the wall.
2. screw 4 anchors(092097100060) into marked spots.
3. screw and secure one floor flange(636660610039) on the ceiling with bolts 092097100060. Make sure to use washers(030699355884) as the size of bolt head is smaller than flange hole)
4. screw the pipe nipple(636660104002) into the ceiling floor flange
5. use knife to cut organic glass(769125020316) to size of projector(The knife won't be able to cut through. Just cut a straight line on the surface, put it on the end of table and snap it apart.)
6. Mark positions on the glass, 3 holes for projector, and four holes for 2nd flange in the center.
7. drill marked holes on the glass. Make sure 3 projector holes loosely fit hex bolts(030699355884), and 4 flange holes fit screws 030699287512
8. Secure second floor flange onto the organic glass piece with 4 screws(030699287512)
9. secure projector on opposite side of organic glass piece with 3 hex bolts(030699355884). Note the bolts can only go 10mm or less into projector. Anything more might damage the projector
10. Now screw this assembled whole piece(2nd floor flange, organic glass and projector) onto the pipe nipple, which was installed on the wall in step 4
11. Turn on projector. Adjust 3 projector bolts(030699355884) to make sure projection image is straight. Also adjust step #10 to make sure perfect rectangle projection image.
Notes.
Using these parts, the center of projector lense is about 4-5 inches below ceiling. This is as close to the ceiling as I can get. If you want it lower, get longer pipe nipple, get longer hex bolts(the screws that go into projector).
I used these drywall toggle bolts(092097100060) because the spot I want to setup the projector is quite far from the beams(wood in the ceiling. spaced 16 inches apart standard). If you can find a spot you know there's wood inside(use a stud finder to find out where the beams are located on the ceiling), you can just use 4 2-inch screws to secure floor flange to ceiling, without any anchors. "


